Targeting Multiple Versions of SQL Server Management Studio
How to use a single build command in Visual Studio to output two or more DLLs from the same project
The interface between SQL Server Management Studio (SSMS) and its add-ins has been known to change between versions, precluding the possibility of one DLL to rule them all. If the features your add-in uses are among those which have changed, targeting multiple versions will mean compiling multiple versions. Thankfully it just takes a few steps to set up.
A number of functions used by VersionSQL work well in both SSMS 2012 and 2014 without any special treatment. Registering context menu items, however, does not. Specifically, Microsoft.SqlServer.Management.UI.VSIntegration.ServiceCache will not instantiate if the version of SqlPackageBase.dll referenced does not match the version of SSMS being run.
There are a number of ways to approach this issue. You could swap out the problematic references by hand before building or develop multiple concurrent codebases, but those both exceed the “too much work” and “I won’t remember to do this every time” thresholds. One possibility that will work in most cases is sharing linked files across duplicate projects. This removes the danger of diverging code changes, but still adds some maintenance overhead when creating new files (and is a bit overkill -- the only variable here is the project dependencies). You might have some luck with custom solution configurations, but that still builds only one version at a time. Instead, let’s get MSBuild to specifically compile our solution twice with a different set of dependencies each time.
Note that this technique can be applied to any Visual Studio solution that needs to be built against multiple versions of its dependencies.
Step 1: Variable Dependency References
Open up your .csproj file in a text editor. It’s really just an XML file, read by Visual Studio and passed to MSBuild upon compilation (even so, commit your code to version control before continuing ...just in case). While parsing the project file, MSBuild interprets variables $(ProgramFiles) and $(OutputPath). These variables can occur anywhere in the XML attributes or contents, including partial reference paths. This means you can replace the version number in the references with a new variable, in this case $(ssms_ver):
Before:
1 2 3 4 5 | <Reference Include="Microsoft.SqlServer.ConnectionInfo, Version=11.0.0.0, Culture=neutral, PublicKeyToken=89845dcd8080cc91, processorArchitecture=MSIL" /><Reference Include="SqlPackageBase"> <HintPath>$(ProgramFiles)\Microsoft SQL Server\110\Tools\Binn\ManagementStudio\SqlPackageBase.dll</HintPath></Reference> |
After:
1 2 3 4 5 | <Reference Include="Microsoft.SqlServer.ConnectionInfo, Version=$(ssms_ver).0.0.0, Culture=neutral, PublicKeyToken=89845dcd8080cc91, processorArchitecture=MSIL" /><Reference Include="SqlPackageBase"> <HintPath>$(ProgramFiles)\Microsoft SQL Server\$(ssms_ver)0\Tools\Binn\ManagementStudio\SqlPackageBase.dll</HintPath></Reference> |
Since you will be building the DLL multiple times, it’d be best if they don’t overwrite each other. You can accomplish this by using the ssms_ver variable in the DLL file name and building directory, as so:
1 2 3 4 5 6 7 8 9 10 11 12 13 14 15 | <PropertyGroup> … <AssemblyName>VersionSQL$(ssms_ver)</AssemblyName> …</PropertyGroup><PropertyGroup Condition=" '$(Configuration)|$(Platform)' == 'Debug|AnyCPU' "> … <OutputPath>.\bin\Debug\$(ssms_ver)</OutputPath> …</PropertyGroup><PropertyGroup Condition=" '$(Configuration)|$(Platform)' == 'Release|AnyCPU' "> … <OutputPath>.\bin\Release\$(ssms_ver)</OutputPath> …</PropertyGroup><br> |
Then add a line to define a default value for this variable In the first PropertyGroup section:
1 2 3 4 | <PropertyGroup> <ssms_ver>11</ssms_ver> …</PropertyGroup> |
Save and close the csproj file. Repeat the process with all other projects in your solution, if any. You can still open and build it just fine -- the default value of 11 will compile it for SQL Server Management Studio 2012. The real benefit comes when you pass in a custom value for $(ssms_ver) and overwrite the default.
Step 2: Custom Build Controller
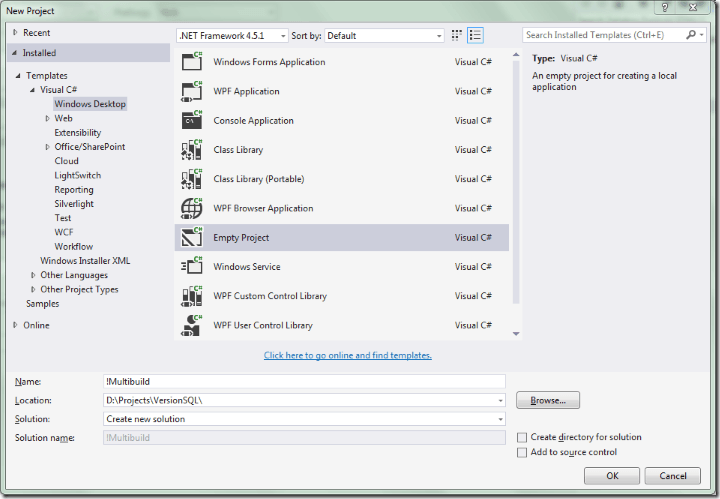
For this step we're going to use an empty project to direct the build
process. Select File->New->Project to add a new empty
project in your solution (I named it “!Multibuild”, with a "!" to keep
it at the top of the Solution Explorer panel and out of the mix of other
projects. Name it whatever you want). Nothing needs to go
in the project – it’s just going to act as a starter to build everything
else.
Save and commit to source control, then open !Multibuild.csproj in a text editor.
First, add a DisableFastUpToDateCheck property with a value of true to the project’s first property group section. DisableFastUpToDateCheck tells Visual Studio to hand off the project to MSBuild when compiling even if the contents of the project haven’t changed. This is good, because they won’t.
1 2 3 4 | <PropertyGroup> <DisableFastUpToDateCheck>true</DisableFastUpToDateCheck> …</PropertyGroup> |
Then add a new section just before the closing </Project> tag to issue some MSBuild commands:
1 2 3 4 | <Target Name="BeforeBuild"> <MSBuild Projects="$(SolutionDir)\VersionSQL.csproj" Properties="Platform=$(Platform);Configuration=$(Configuration);ssms_ver=11" /> <MSBuild Projects="$(SolutionDir)\VersionSQL.csproj" Properties="Platform=$(Platform);Configuration=$(Configuration);ssms_ver=12" /></Target> |
These instruct MSBuild to execute another instance of MSBuild for the target projects with the specified parameters. This is where the magic happens. See how it tells MSBuild to compile VersionSQL.csproj two separate times, each time passing a different value for $(ssms_ver)? Combine that with the variables in VersionSQL.csproj and you’ve got two different DLLs targeted for two different versions of SSMS.
Now all that’s left is to make Visual Studio trigger Multibuild rather than issuing build commands to each project individually.
Step 3: Configuration and Dependencies
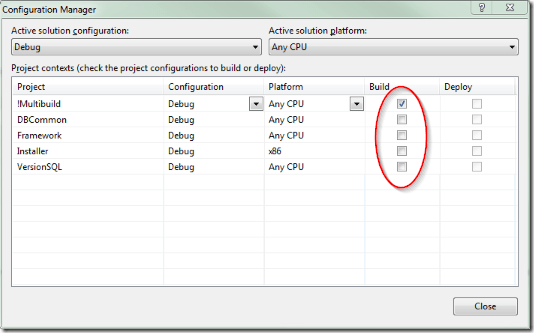
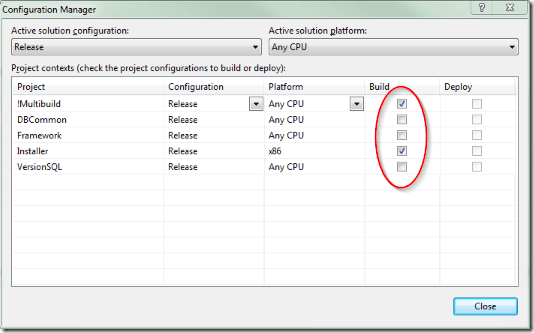
Now let’s put Multibuild in charge. Open up your solution in Visual Studio and head to the Build->Configuration Manager menu. For both Debug and Release, uncheck the checkbox in the Build column for every project except Multibuild (and your installer if you have one, in Release):
Now build your solution and open the output directory. If everything worked as planned, you will see the directories “11” and “12” containing the project output DLL files. Congratulations! Remember to update your .csproj files if you add any new SSMS DLLs to your projects or new projects to your solution.
Step 4: Debugging Multiple Versions
If you have multiple versions of SSMS on your computer, follow these next steps to allow Visual Studio to use either one when debugging.
Step 4.A: Multiple .AddIn Files
By default, SSMS 2008R2 and newer look for add-ins in both
C:\Users\<username>\AppData\Roaming\Microsoft\MSEnvShared\Addins
and
C:\ProgramData\Microsoft\SQL Server Management Studio\<version>.0\Addins
The first one is restricted to a single Windows user, but is shared by all versions of SQL Server Management Studio. The second one applies to all users of the machine, but is nicely grouped into folders by version number.
Take the .AddIn file for your project and move it to C:\ProgramData\Microsoft\SQL Server Management Studio\11.0\Addins. You may need to create the directory if it doesn’t exist. Edit the file and change the <Assembly> tag value to point to your add-in’s DLL compiled for SSMS 2012. For instance:
1 | <Assembly>D:\Projects\VersionSQL\bin\Debug\11\VersionSQL11.dll</Assembly> |
Copy that file into the C:\ProgramData\Microsoft\SQL Server Management Studio\12.0\Addins directory, and point it to your add-in’s DLL compiled for SSMS 2014. For instance:
1 | <Assembly>D:\Projects\VersionSQL\bin\Debug\12\VersionSQL12.dll</Assembly> |
Step 4.B: Switching Between Versions
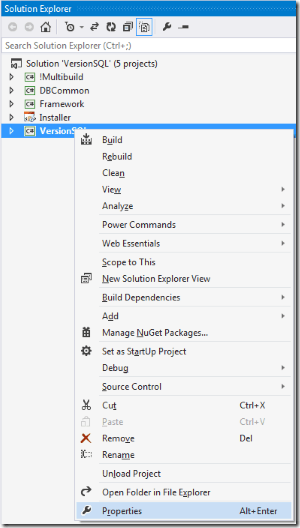
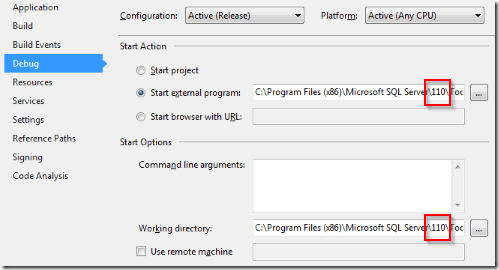
Because both DLLs referenced by the two .AddIn files are recreated during every build, you can successfully debug with whichever SSMS version Visual Studio launches. Swap them out by opening the startup project’s properties, navigating to the Debug tab, and substituting the “external program” path and working directory for the version you want to test.
SQL Server Management Studio 2012 is in the 110 directory:
SQL Server Management Studio 2014 is in the 120 directory:
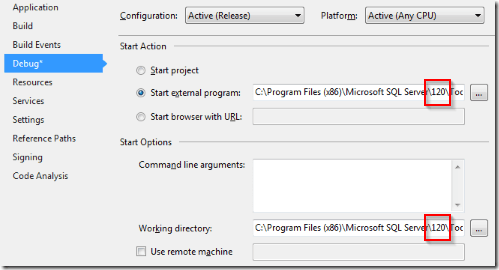
Save, then press F5 to start debugging. Visual Studio will open the version of SQL Server Management Studio you selected and your add-in along with it. Happy testing!
