Use WiX Toolset to Install SSMS 2008R2/2012/2014 Add-Ins
Learn how to install a SQL Server Management Studio add-in via the WiX toolkit in Visual Studio 2013
So now you've built a useful SQL Server Management Studio add-in from freely-available boilerplate code, tweaked it and tested it until it solves just the problem you were having, even configured it to compile for multiple versions of SSMS, and now you want to share it with the world. Just one problem -- the installers in the add-in examples relied on vdproj (Visual Studio Installer Project) files, which are no longer supported in Visual Studio 2012 or 2013. You could install the backwards-compatibility plug-in, but Microsoft has made clear that the .vdproj format is dead and the WiX Toolkit is its successor.
This same process applies equally well to creating a WinForms or WPF application installer using WiX -- just skip anything referencing .Addin files and imagine the DLL files are EXEs instead. Afterwards, see the WiX documentation for how to create a start menu shortcut or uninstall shortcut, and check this post on Stack Overflow for two ways to create a desktop shortcut.
Contents
- Install WiX Toolset
- Add a Setup Project
- Set Build Order
- Set Build Profile
- Basic Configuration
- Specify Files
- Supporting Both 32-Bit and 64-Bit Systems
- Requiring .NET 4.5
- Select UI Type
- Custom End-User License Agreement
- Custom Completion Text
- Custom Images
- Even More
Install WiX Toolset
Head over to http://wixtoolset.org/ and download the latest version of the WiX Toolset. In this tutorial we'll be using WiX version 3.10.
(Note: Version 3.9R2 is the latest stable release as of this writing, but version 3.10 or later is required to be able to enforce the presence of .NET 4.5 on the destination system. Also note that version 4.0 may introduce syntax changes, though the bulk of this tutorial will still apply. Development releases can be downloaded from the Weekly Releases page.)
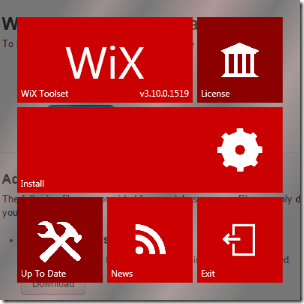
Launch the oh-so-stylish setup program and click on the Install tile in the middle.
Add a Setup Project
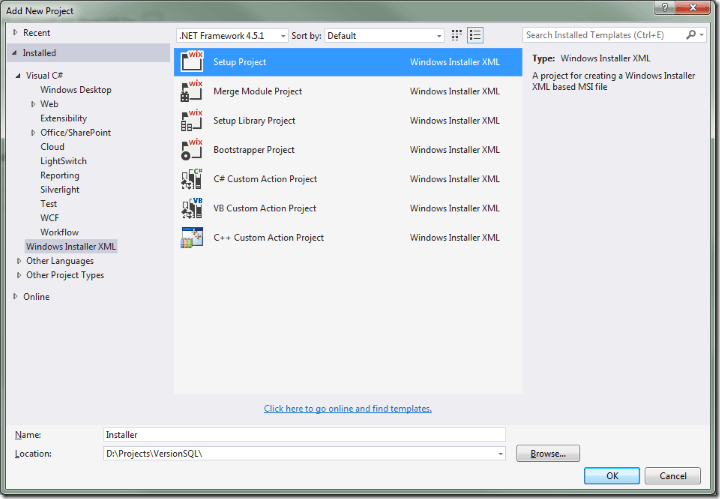
Open your solution in Visual Studio, then navigate to File->Add->New Project.... You should see a new project category in the list titled "Windows Installer XML". Click on that, then on Setup Project in the list of project types. Name your installer, then click OK. Visual Studio will work in the background a bit, then add the installer project to your Solution Explorer list and open up Product.wxs in the code editor.
Set Build Order
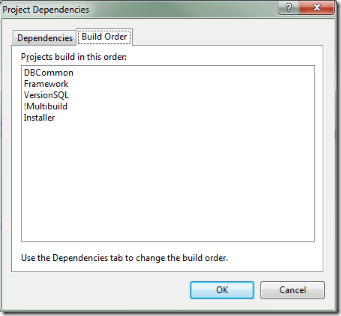
One step that is really important is to make sure that the installer project builds after all your other projects build. If the installer builds beforehand, it'll package up old code and spread confusion all around.
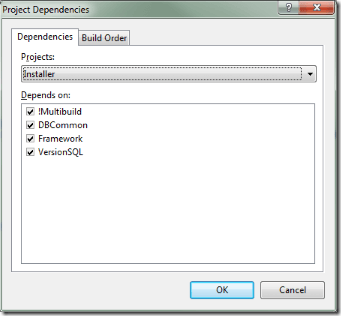
To change the build order, open the Project menu and click on the Project Dependencies... menu item. Select your installer in the Projects drop-down list and make sure all the boxes in the list below it are checked.
Now if you click on the Build Order tab, you can see that your installer is last in the list and will therefore build after everything else.
Set Build Profile
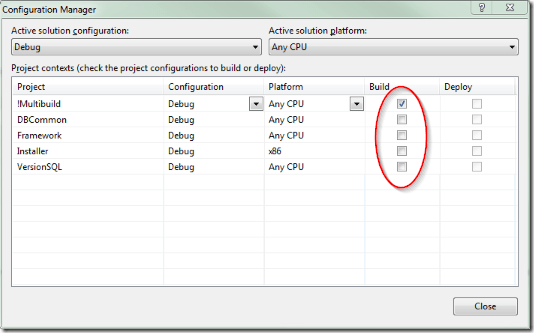
Really the only time the installer needs to build is when the add-in is ready to deploy for testing on another machine or release. Building setup files takes a fair amount of time, too -- more time that I want to wait when debugging. To avoid this, set up the installer to build only in the Release configuration by navigating to the Build->Configuration Manager window, selecting the Debug configuration, and unchecking the installer project (named Installer in this case).
Basic Configuration
The meat and potatoes of the WiX Toolset is in Product.wxs. This is an XML file that provides all of the information about how the installer will look and function. When you first create the project, here's what it will look like (for version 3.10):
<?xml version="1.0" encoding="UTF-8"?>
<Wix xmlns="http://schemas.microsoft.com/wix/2006/wi">
    <Product Id="*" Name="Installer" Language="1033" Version="1.0.0.0" Manufacturer="" UpgradeCode="EXAMPLE0-556f-487f-a936-e51d58924e33">
        <Package InstallerVersion="200" Compressed="yes" InstallScope="perMachine" />

        <MajorUpgrade DowngradeErrorMessage="A newer version of [ProductName] is already installed." />
        <MediaTemplate />

        <Feature Id="ProductFeature" Title="Installer" Level="1">
            <ComponentGroupRef Id="ProductComponents" />
        </Feature>
    </Product>

    <Fragment>
        <Directory Id="TARGETDIR" Name="SourceDir">
            <Directory Id="ProgramFilesFolder">
                <Directory Id="INSTALLFOLDER" Name="Installer" />
            </Directory>
        </Directory>
    </Fragment>

    <Fragment>
        <ComponentGroup Id="ProductComponents" Directory="INSTALLFOLDER">
            <!-- TODO: Remove the comments around this Component element and the ComponentRef below in order to add resources to this installer. -->
            <!-- <Component Id="ProductComponent"> -->
                <!-- TODO: Insert files, registry keys, and other resources here. -->
            <!-- </Component> -->
        </ComponentGroup>
    </Fragment>
</Wix>
The first things to change are in the Product tag. Name is your add-in's name, Version is its current version number, and Manufacturer is your name or company name. UpgradeCode is the GUID for your add-in's installer, and allows the installer to detect if a previous version of your add-in is already installed. Changing that between releases will break upgrade functionality, so leave it alone.
Here's the Product tag with VersionSQL's information filled in:
<Product Id="*" Name="VersionSQL Add-In for SQL Server Management Studio" Language="1033" Version="0.52.15084.1831" Manufacturer="MV Webcraft, LLC" UpgradeCode="EXAMPLE0-556f-487f-a936-e51d58924e33">
Next, add EmbedCab="yes" to the MediaTemplate tag. By default, WiX generates both an .msi file and a .cab file. The EmbedCab="yes" attribute tells it to combine the .cab file into the .msi file so there's only one file to distribute.
<MediaTemplate EmbedCab="yes" />
Specify Files
The last thing to set up before you can successfully run the installer is to tell WiX which files need to be installed and where. The Product.wxs XML starts with boilerplate code hinting at what to do:
<?xml version="1.0" encoding="UTF-8"?>
<Wix xmlns="http://schemas.microsoft.com/wix/2006/wi">
    <Product Id="*" Name="VersionSQL Add-In for SQL Server Management Studio" Language="1033" Version="0.52.15084.1831" Manufacturer="MV Webcraft, LLC" UpgradeCode="EXAMPLE0-556f-487f-a936-e51d58924e33">
        ...
        <Feature Id="ProductFeature" Title="Installer" Level="1">
            <ComponentGroupRef Id="ProductComponents" />
        </Feature>
    </Product>

    <Fragment>
        <Directory Id="TARGETDIR" Name="SourceDir">
            <Directory Id="ProgramFilesFolder">
                <Directory Id="INSTALLFOLDER" Name="Installer" />
            </Directory>
        </Directory>
    </Fragment>

    <Fragment>
        <ComponentGroup Id="ProductComponents" Directory="INSTALLFOLDER">
            <!-- TODO: Remove the comments around this Component element and the ComponentRef below in order to add resources to this installer. -->
            <!-- <Component Id="ProductComponent"> -->
                <!-- TODO: Insert files, registry keys, and other resources here. -->
            <!-- </Component> -->
        </ComponentGroup>
    </Fragment>
</Wix>
ComponentGroupRef
Each ComponentGroupRef is a group of components (in our case, files) that will be installed to a location. VersionSQL has three: One for the DLLs, one for the SSMS 2012 .AddIn file, and one for the SSMS 2014 .AddIn file:
<Feature Id="ProductFeature" Title="VersionSQL" Level="1">
    <ComponentGroupRef Id="VersionSQLDLLs" />
    <ComponentGroupRef Id="VersionSQL2012Addin" />
    <ComponentGroupRef Id="VersionSQL2014Addin" />
</Feature>
Directories
Next, tell WiX the destination directories for each of these component groups. In this case, it's a VersionSQL directory inside of Program Files, and the SQL Server Management Studio 2012 and 2014 add-in directories.
<Fragment>
    <Directory Id="TARGETDIR" Name="SourceDir">
        <Directory Id="ProgramFilesFolder">
            <!-- Make sure the path in the .addin files match this -->
            <Directory Id="ProgFilesVersionSQL" Name="VersionSQL" ></Directory>
        </Directory>
        <Directory Id="CommonAppDataFolder">
            <Directory Id="Microsoft" Name="Microsoft">
                <Directory Id="SSMS" Name="SQL Server Management Studio">
                    <Directory Id="SSMS2014VERSION" Name="12.0">
                        <Directory Id="SSMS2014ADDIN" Name="Addins" />
                    </Directory>
                    <Directory Id="SSMS2012VERSION" Name="11.0">
                        <Directory Id="SSMS2012ADDIN" Name="Addins" />
                    </Directory>
                </Directory>
            </Directory>
        </Directory>
    </Directory>
</Fragment>
Remember from a previous post that .AddIn files targeting a specific version of SSMS goes in the C:\ProgramData\Microsoft\SQL Server Management Studio\<version>.0\Addins folder. The directory ID of CommonAppDataFolder above points to the ProgramData folder even if the user's Windows installation isn't on drive C. Same with ProgramFilesFolder, which has the added benefit of always referencing the correct 32-bit application folder (Program Files (x86) for a 64-bit OS and Program Files for a 32-bit OS).
Components
Finally, WiX needs to know what files are a part of each component:
    <Fragment>
        <ComponentGroup Id="VersionSQLDLLs" Directory="ProgFilesVersionSQL">
            <Component Guid="{EXAMPLE0-DE5D-4BE4-9EB3-3FE354F818A3}">
                <File Source="$(var.VersionSQL.ProjectDir)\bin\Release\11\VersionSQL11.dll" KeyPath="yes" />
            </Component>
            <Component Guid="{EXAMPLE0-9765-4234-A4C2-42B81299A16F}">
                <File Source="$(var.VersionSQL.ProjectDir)\bin\Release\12\VersionSQL12.dll" KeyPath="yes" />
            </Component>
            <Component Guid="{EXAMPLE0-729B-4A2B-89EE-0ECB1BA79B12}">
                <File Source="$(var.VersionSQL.TargetDir)\SharpSvn.dll" KeyPath="yes" />
            </Component>
            <Component Guid="{EXAMPLE0-24EF-449E-976A-32767EDA18F8}">
                <File Source="$(var.VersionSQL.TargetDir)\SharpSvn.UI.dll" KeyPath="yes" />
            </Component>
        </ComponentGroup>
        <ComponentGroup Id="VersionSQL2012Addin" Directory="SSMS2012ADDIN">
            <Component Guid="{EXAMPLE0-7387-4918-8AAE-BD2EA799A77F}">
                <File Id="Addin2012" Source="$(var.SolutionDir)\AddinFiles\2012\VersionSQL.Addin" KeyPath="yes" />
            </Component>
        </ComponentGroup>
        <ComponentGroup Id="VersionSQL2014Addin" Directory="SSMS2014ADDIN">
            <Component Guid="{EXAMPLE0-9DFE-41E2-8C78-3BA235667F20}">
                <File Id="Addin2014_x64" Source="$(var.SolutionDir)\AddinFiles\2014\VersionSQL.Addin" KeyPath="yes" />
            </Component>
        </ComponentGroup>
    </Fragment>
The Id attribute for each ComponentGroup matches up with the Id attribute on its corresponding ComponentGroupRef defined earlier, and the Directory attribute for each ComponentGroup matches up with the Name attribute on its corresponding Directory defined earlier.
Important: Each component must have a unique GUID. You can generate these easily from the Tools->Create GUID menu. Choose GUID Format 4 and click New GUID, then Copy, and then paste it into the Guid attribute. Note that the example GUIDs in this post's code are not valid.
Important: Make sure the reference path inside each .AddIn file points to the correct location where its corresponding DLL will be after installation!
Installing Per-User
The above assumes you are installing for SQL Server Management Studio 2012 and 2014, and on a per-machine basis. If you'd rather your add-in be installed only for the current user and for a single version of SSMS (or, if it works equally well for all versions), you only need one ComponentGroupRef for your .AddIn file. Also, the .AddIn file should be installed into the C:\Users\<username>\AppData\Roaming\Microsoft\MSEnvShared\Addins folder, which looks like this:
<Directory Id="AppDataFolder">
    <Directory Id="Microsoft" Name="Microsoft">
        <Directory Id="MSEnvShared" Name="MSEnvShared">
            <Directory Id="SSMSADDIN" Name="Addins" />
        </Directory>
    </Directory>
</Directory>
Then your ComponentGroup's Directory attribute would reference SSMSADDIN instead of SSMS2012ADDIN and SSMS2014ADDIN.
(Fun fact: The special IDs WiX uses for system folders can be found in Microsoft's System Folder Properties Reference.)
Supporting Both 32-Bit and 64-Bit Systems
VersionSQL is a 32-bit DLL, so I install it to the 32-bit Program Files directory by specifying "ProgramFilesFolder" as the Directory tag's ID attribute value. On 32-bit systems, this resolves to C:\Program Files by default, but on 64-bit systems this resolves to C:\Program Files (x86). Problem is, the .AddIn file must contain the full, exact path to the add-in's DLL no matter what system it is installed on.
No problem, all reference to system directories should be using environment variables anyways, right? Like this:
<?xml version="1.0" encoding="UTF-16" standalone="no"?>
<Extensibility xmlns="http://schemas.microsoft.com/AutomationExtensibility">
    <HostApplication>
        <Name>Microsoft SQL Server Management Studio</Name>
        <Version>*</Version>
    </HostApplication>
    <Addin>
        <FriendlyName>VersionSQL</FriendlyName>
        <Description>Database Version Control Add-in</Description>
        <Assembly>%programfiles(x86)%\VersionSQL\VersionSQL11.dll</Assembly>
        <FullClassName>VersionSQL.Connect</FullClassName>
        <LoadBehavior>1</LoadBehavior>
        <CommandPreload>0</CommandPreload>
        <CommandLineSafe>0</CommandLineSafe>
    </Addin>
</Extensibility>
In the example above, the %programfiles(x86)% environment variable will reference the C:\Program Files (x86) directory on 64-bit machines and , and all will be well... as long as every computer that will use the add-in is running on a 64-bit OS. Sadly, 32-bit versions of Windows do not have the %programfiles(x86)% environment variable. On 32-bit versions of Windows %programfiles% is the 32-bit program files directory, because that's the only one they have.
We're stuck with creating separate 32-bit and 64-bit .AddIn files, then. They can be exactly the same except for the assembly path reference.
For 64-bit systems (same as the example above):
<Assembly>%programfiles(x86)%\VersionSQL\VersionSQL11.dll</Assembly>
For 32-bit systems:
<Assembly>%programfiles%\VersionSQL\VersionSQL11.dll</Assembly>
Now there are two .AddIn files (for each version of SSMS), how does WiX know which to use? Turns out, you can tell it with a Condition:
<ComponentGroup Id="VersionSQL2012Addin" Directory="SSMS2012ADDIN">
    <!-- This version of the .AddIn looks at %programfiles(x86)%, which will always point to the x86 Program Files directory on x64 systems -->
    <Component Guid="{EXAMPLE0-DE5D-4BE4-9EB3-3FE354F818A3}">
        <File Id="Addin2012_x64" Source="$(var.SolutionDir)\AddinFiles\2012\x64\VersionSQL.Addin" KeyPath="yes"  />
        <Condition><![CDATA[VersionNT64]]></Condition>
    </Component>
    <!-- This version of the .AddIn looks at %programfiles%, because there's only one on x86 systems Windows 32-bit doesn't support %programfiles(x86)% -->
    <Component Guid="{EXAMPLE0-DE5D-4F95-A490-FDA932EEC469}">
        <File Id="Addin2012_x86" Source="$(var.SolutionDir)\AddinFiles\2012\x86\VersionSQL.Addin" KeyPath="yes"  />
        <Condition><![CDATA[Not VersionNT64]]></Condition>
    </Component>
</ComponentGroup>
In the example above, I've named both the 64-bit and 32-bit versions of VersionSQL's .AddIn files the same and put them in separate subdirectories. I could have just as easily keep both in the same directory and named them VersionSQL64.Addin and VersionSQL32.Addin.
Requiring .NET 4.5
VersionSQL takes advantage of some of the new features in .NET 4.5, particularly async. To ensure that the user isn't greeted with an error dialog upon first run, the installer should detect if their system has the .NET 4.5 framework installed. WiX can handle this, with the WixNetFx extension. (Note: checking for .NET 4.5 requires WiX 3.10 or later)
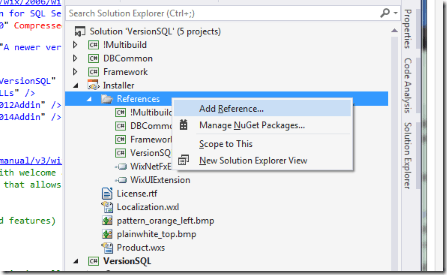
First, add a reference to the WixNetFxExtension DLL. Right-click on the installer project's References folder and select Add Reference...:
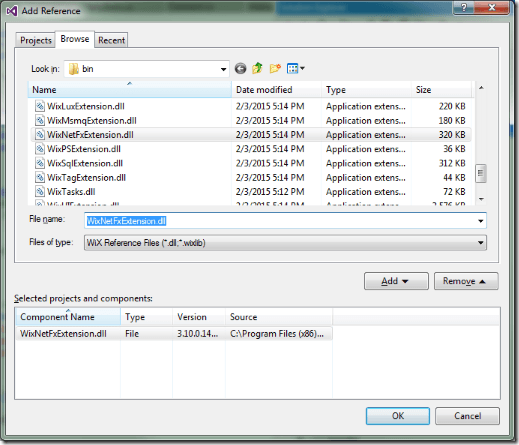
Next browse to the WiX bin folder, C:\Program Files (x86)\WiX Toolset v3.10\bin by default, and add WixNetFxExtension.dll:
Then, in Product.wxs, add this code below the MediaTemplate tag:
<!-- Require .NET 4.5+ -->
<PropertyRef Id="WIX_IS_NETFRAMEWORK_45_OR_LATER_INSTALLED"/>
<Condition Message="This application requires .NET Framework 4.5 or later. Please install the .NET Framework then run this installer again.">
    <![CDATA[Installed OR WIX_IS_NETFRAMEWORK_45_OR_LATER_INSTALLED]]>
</Condition>
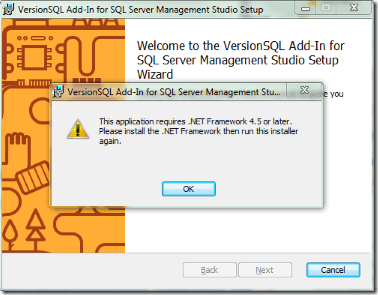
Anyone attempting to run this version of the VersionSQL installer for SQL Server Management Studio 2012 and 2014 on a computer without the .NET 4.5 framework installed will be greeted with the following message:
If your add-in uses a different version of the .NET other than 4.5, replace WIX_IS_NETFRAMEWORK_45_OR_LATER_INSTALLED with the appropriate keyword:
- NETFRAMEWORK11
- NETFRAMEWORK20
- NETFRAMEWORK30
- NETFRAMEWORK35
- NETFRAMEWORK40FULL
- NETFRAMEWORK40CLIENT
- WIX_IS_NETFRAMEWORK_40_OR_LATER_INSTALLED
- WIX_IS_NETFRAMEWORK_451_OR_LATER_INSTALLED
- WIX_IS_NETFRAMEWORK_452_OR_LATER_INSTALLED
- WIX_IS_NETFRAMEWORK_46_OR_LATER_INSTALLED
- Full list
Conceivably, these condition keywords could be used in the same way the VersionNT64 keyword was used in the previous section to install different DLLs depending on which version of the .NET framework is present, for maximum compatibility.
Select UI Type
The most basic installer that WiX generates by default installs everything as soon as it is run -- no prompting. That can be surprising to the user, since most applications guide them through the process even if it is short. WiX comes with a number of other dialog sets, and even supports custom XAML "bootstrapper" interfaces. For a basic SQL Server Management Studio add-in, a couple buttons and a progress bar will suffice.
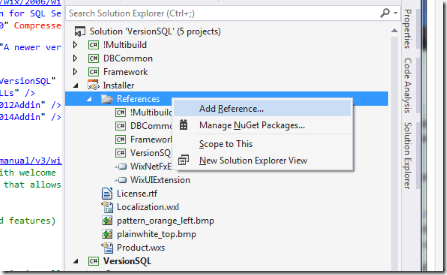
First, add a reference to the WixUIExtension DLL. Right-click on the installer project's References folder and select Add Reference...:
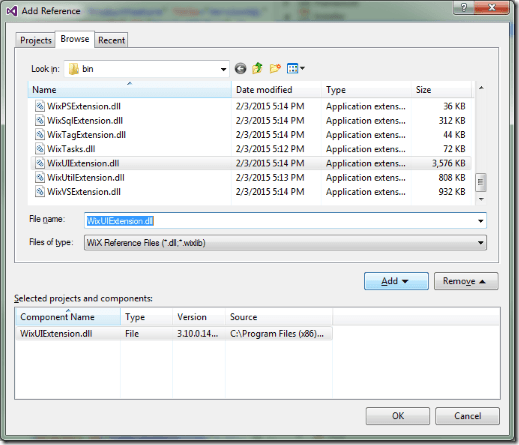
Next browse to the WiX bin folder, C:\Program Files (x86)\WiX Toolset v3.10\bin by default, and add WixUIExtension.dll:
Then, in Product.wxs, add this line below the MediaTemplate tag to reference the Minimal dialog set:
<UIRef Id="WixUI_Minimal" />
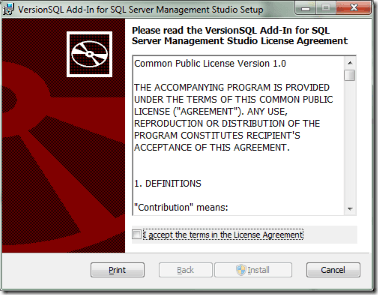
This will add a welcome / license agreement page to the installer, making it a little more interactive.
Custom End-User License Agreement
Read through the default EULA; if it works for you, great! Otherwise, here's how to replace it.
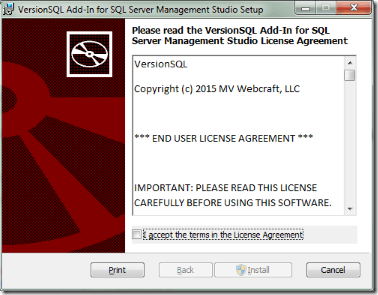
First, obtain agreement text for your desired license. Depending on your situation, this could be as simple as searching the Internet for "free EULA" or as complex as hiring a lawyer. Whichever way you go, once you have it save it as License.rtf in your installer project folder. Then add the following code anywhere between the <Product> and </Product> tags in Product.wxs:
<WixVariable Id="WixUILicenseRtf" Value="License.rtf" />
Build the solution, then run the output .msi file to see the new end-user license in place:
Custom Completion Text
The basic outro doesn't tell the user anything new:
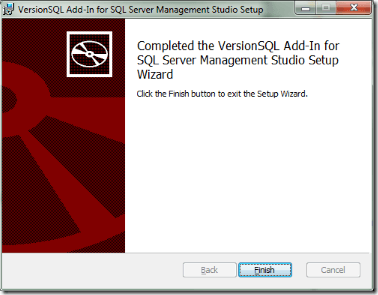
With VersionSQL being a SQL Server Management Studio add-in, though, I feel that a little more info is in order. After all, if the user has SSMS open while installing the add-in, SSMS won't load the add-in until the next time it runs. Customizing the completion text is as simple as the following one-liner (between the <Product> and </Product> tags in Product.wxs):
<Property Id="WIXUI_EXITDIALOGOPTIONALTEXT" Value="If SQL Server Management Studio is currently running, please close and reopen it to begin using VersionSQL." />
Here's what that looks like:
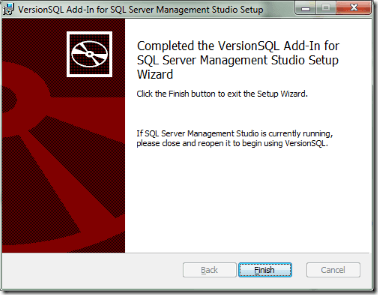
A small change, but it cost no more than a minute's time and could potentially alleviate some confusion.
Custom Images
The default installer images are embarrassingly retro, probably on purpose. Good thing that's easy to change! There are two main images:
- Dialog bitmap: 493 x 312 pixels
- Template: dialog.bmp
- Banner bitmap: 493 x 58 pixels
- Template: banner.bmp
Feel free to use the above templates as a base for building your own, or as-is if you dig the minimalistic-monochromatic look. However you go about it, put two bitmap files in your installer project directory and reference them with the following code (also placed between the <Product> and </Product> tags in Product.wxs, like the other customizations):
<WixVariable Id="WixUIDialogBmp" Value="dialog.bmp" />
<WixVariable Id="WixUIBannerBmp" Value="banner.bmp" />
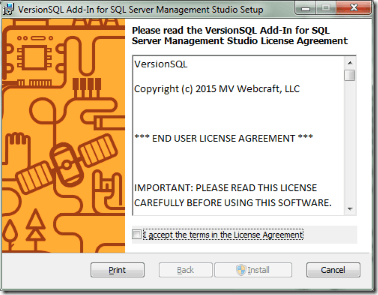
Much better.
Even More
For the full range of tweaking goodness, more information about customizing the WiX installer is available in the WiX documentation.
This is just the beginning of what the WiX Toolset is capable of. But at the same time, no more than the first few steps are required to get a fully-functional installer. If you want to explore all of what WiX has to offer, check out the official documentation or this amazing tutorial.
Have any cool WiX Toolkit tricks up your sleeve? Share them in the comments!
